Thursday, September 22, 2011

The Mystery of Coral Castle

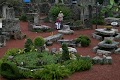
     Debating for some time to post this article on this blog, my visitors are special to me. So I'm going to share a vacation attraction that occurred in Miami Florida that was quite interesting. This tour was arranged by my brother. How he discovered this attraction is beyond me, although he does a lot of research. I was kinda skeptical about the whole Miami idea, but nevertheless, I was really taken by the ordeal when my feet landed on coral castle soil. For those that aren't familiar with Coral Castle, it's a tourist attraction located in Miami Florida. A small estate, hand created and designed out of coral stone. The designer of this tourist phenomena was a man by the name of Ed leedskalnin. Weighing only 100 pounds and standing at a height of 5 feet tall, he was able to carve and move structures that defy logic. More importantly, is the fact that he was able to move enormous stone objects without the use of cranes or heavy equipment. Taken by fascination I began to take photo shots of this ordeal. The photo image below is the first thing you see as you enter into the castle.


While entering the Castle your accompanied by a tour guide who explains why he created such an attraction and a theory of how he miraculously moved tons of rock. The story is about his first love at 26 years of age. The girl in which he fell in love with was a girl by the name of Agnes scuffs. She was 10 years younger than Ed. Nevertheless, he anticipated his sweet sixteen becoming his first bride to be. Unfortunately, she cancelled the wedding ceremony a day before. Hurt and torn by the cancellation he began a long and laborious journey to build a home of stone to confess his love he had for Agnes. Below you can see heart shaped tables and stone carved lounge stools.


 Ed's dedication is noting short of amazing. The below image appears to be a the resemblance of a reclining chair. Nothing that I would find comfortable but, nevertheless absolutely amazing. The following image is a jacuzzi styled tub.


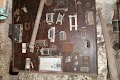
 Although, they are theories of how Ed moved and carved the rock no one really knows. He was able to cut into 4,000 thousands of pounds of rock with only hand tools. These are some of the hand tools  that were actually used in carvings. Some of the electrical devices appear to be transformers. Locals believe that he cleverly mastered the formula for levitation, and that these components were part of that formula. Most of Ed's work was done at night so that his secrets of levitation would be sealed forever.


The main entrance to the museum offers maps, souvenirs, brochures and displays many tools and artifacts that he used. They even displayed a pair of his actual shoes he wore in the early 1900's while constructing his sweet sixteen's dream suite.Thousands of tourist from all over come to visit this extraordinaire.


These stairs lead to his living quarters.


      Inside the living quarters is (starting for the top to the bottom}a ingenious food holding chamber which is
 made from wood and chicken wire.The chicken wire provides a view and protection from flying pest such as flies. Supported by a single metal rod from the ceiling, this chamber is suspended several feet from the floor.
This prevents ants and other household pets from crawling inside. The metal cone which looks like a oil funnel is part of the rod support system. It is is filled with oil. Ingeniously designed, when pests crawl up the wall and
down the metal rod looking for food they fall into the oil filled cone sealing there fate. 
The following  image is a hammock styled bed. Its made from wooden planks and is its also suspended
in the air by a chain anchored supporting system, again this may to prevent the nuisance of common pests.
Lastly, is an image of a chair which its seat area has been removed and replace with what appears to be tough rubber from a tire inner tube. This provided comfort, I guess with all of the stone chairs he needed some
type of relief.


Sadly, Ed leedskalnin died of tuberculosis leaving behind the castle and some unanswered questions of the mystery of the Castle. This cardboard created scene of Mr. leedskalnin is the actual size and height when he was a resident of the castle.


If you ever visit Florida make sure you visit the castle. Its a great family spectacular that I'm sure you
will not regret!!


Monday, September 5, 2011

Super Bright LED Experiment


Ultra High Intensity Led Dazzler


LED's are certainly nothing short of amazing. Available in many sizes, shapes, colors and voltages
the LED has become a popular name in the home.  Still used in some instances, the incandescent light bulb was once a revolutionary break through of its time, however, has proven to be subservient to the LED.  Its characteristics are limited in lumen power and shelf life. Unlike its' cousin the LED uses much less energy and renders far greater lumen power. In the two experiments below you can see the  LEDs' versatility and the applications it can be used in as well.  


This experiment consists of 2 LED p7 high intensity LEDs that are mounted inside a Altoids mint can. This experiment demonstrates how compact and small the project can be and still achieve the lighting capacity desired. The Project also contains a micro controller, a driver circuit, 2 SSC p7 LED's and ( 2) 1.5 Nickel Hydride batteries rated at 3.7volts ea. A dazzler is a device that temporarily blinds an attacker with bright light in an assault, aiding the victim to an optional escape route during the attack.


View this experiment


In following experiment we can see the utilization of the LED as far as a alert tool or a communication device.
Devices like this one on a larger scale are ultimately used in Amber Alerts which are designed to reveal information that may assists law enforcement in emergency situations. These devices are engineered and employed on state highways and roadways. The LED light display below is a 8 pin dip chip coupled to a micro controller circuit.

View this experiment


Thursday, August 25, 2011

2funny Diy Gadget Pranks!!


Have you ever encountered an interest in a new product or Idea that caught your attention, so much that you bought it anyway without really knowing how it worked. Well, that's me! sorta ! I mean I'm more interested in how it works than what it was intended for. However, I understand that everyone has different interests. That's why I created this post. It's a little of both worlds gadgets and how well they work combined into entertainment. Relax kick your feet up and enjoy!

PS.If you are a DIYer, Check out my DIY projects for some cheap novelty and gift ideas!

I was given 20 pill containers of all sizes to see how many gadgets I could come up with. So, with a desk, a small light, soldering iron, some switches and motors I began my journey. Some of my earlier posts are some of these gadgets like the USB desk lite, Diy Allspice Seasoner, Hand shake pill prank and Jitters Creepers. This post are some of the other creations that are included in my journey. I'm sure you will enjoy the clips as much as I have enjoyed making them.

This gadget looks like an ordinary pill container. And that is exactly what it looks like to the pranks tee. I designed it so that the prankster has very little effort pulling off this prank. Armed for excitement, once the cap is lifted the creepy spider appears to be spinning a web for its victims. One glimpse at this and the container is history!! Click the below video to see two adorable kids desperately trying to remove the  cap of the container. Rewarded by their efforts, this is totally not what they want to see.


You've guessed right if your guessing at all. That's right its another episode of gadget pranks.
I love making gadgets. And when I'm not making them I'm using them. In fact, I have more
gadgets to post on my blog for you guys. Between juggling projects  making videos and arranging
pranks I consider myself pretty busy. So stay tuned to see whats next between the juggling. In 
this episode there is a cashier thats pretty cool. I've been wanting to prank her for some time.
In fact I've got most of her co workers, which will be a later episodes so you dont want to miss them.
Click on the video below to see the results of this prank.


Designing a prank successfully depends on how original the prank looks to the victim. In this video I will show you how originality plays a major role in pulling of a successful prank. Later, enjoy the prank that takes place in a cosmetology parlor. Unsure of what lurks inside of this pill bottle one of the employees quickly runs for
cover by asking a co-worker for assistance click on the video below to view this clip of laughter.


Monday, August 15, 2011

DIY "jitters Creepers" Cool kids Projects


Review this gadget

   For this project you'll need the following items:

1) 2 identical plastic pill containers
2) Translucent hollow ball which you can find inside of a large roll on deodorant dispenser
3) Spring from a ball point pen
4) Lighter
5) Velcro (color of your choice I'm using black) or critter of your own ?
6) Hole puncher
7) Scissors


Using your Dremel cutting tool, cut the hollow ball in half. There should be an linear marking on the ball
where the ball was fused together from 2 halves. You can use this marking as a guide to cut the ball in 2 even
halves.


Next, make sure that your half sphere is slightly smaller than your pill container. Use the bottom of your container to check the measurement


 Using your dremel cutting tool cut the bottom off of your pill bottle container. Always take your time on your
projects to maximize the effectiveness and to perfect craftsmanship. You will always appreciate your work and other will see and compliment the craftsmanship if your not rushing through it. Your projects will also perform the way you intended them to.


Using your lighter heat up one side of your spring. When the spring becomes hot (orange in color ) push it into
the middle of the hollowed sphere. I'm using needle nose pliers to hold the spring however, the wire is so small that it really doesn't transfer heat to the other side as you would think. As shown below


 Now heat up the other side of the spring and stick it into the top of the pill bottle container. But before you do hold the spring in your fingertips and make sure it tremors if not stretch the spring just a little until it does.


Using your Velcro design a face on your hollow sphere. I used the hole puncher which was helpful to create the nose and eyes. Be creative as you want. You can also use plastic bugs and spiders whichever you
prefer.


When you have created the "critter" that your satisfied with, place it inside of the pill bottle that you originally
cut the bottom off. Push it all the way, close to the top, just enough so that its able to shake without being interrupted by the sides of the bottle.


When you have the face positioned in place use your fingers and pinch the side of the container to hold the cap in place while using the soldering iron to tack the inserted cap inside of the container. As shown below.


After tacking you should reinforce the position of your tack with superglue. The translucent sphere gives the appearance that the face is floating in the container. These are cool giveaways to trick or treaters or just to put a smile on the " get well soon" patient.  The added effect is in your hands.


Friday, July 29, 2011

DIY Hand Held 1.5 Motorized Allspice Shaker


If your looking for that perfect seasoned flavor this gadget offers nothing short of perfection. Powered by
a tiny 1.5  d.c. motor. This project is certainly fun as well as a conversational piece.

View the results of this  Gadget

Can you remember your very first cooking experience. I'm sure you can laugh about it now but, if it was anything  like my first cooking venture then you probably ended up at a  fast food restaurant. Don't get me wrong this gadget isn't a replacement of a cook, its' an aide if you can cook! It evenly sprinkles particles from the vibrations of the concealed motor. This gadget allows you to uniquely dispense a
variety of spices by simply removing the twist of cap and adding your spice of choice.

To begin this project you'll need a pepper container.


Remove the original lid from the container so that your container's lid can be modified.


Find a small twist off capped container that will fit comfortably inside of the pepper container. Use a pencil  mark the measurements from the container's lid to the peppers lids'. I used a dremel sanding tool to
accurately make a perfect fit. Afterwards placing the container inside the hole and piecing everything
together like a puzzle.


At this point we are semi finished with the lid for now. And focused
on a momentary push button which I drilled a hole in the side of the pepper container that would
accommodate the switch. You can find the switch at a local electronics store or online.


Since the container will consume most of the inside space I elected to use a tiny 1.5 dc motor. You
can purchase them online however, since I was going to upgrade my toothbrush which is electric so why not use use the motor inside of it, so I did.
In my earlier video I chose to mount (solder) the motor on the inside wall of the pepper container. Which is fine
however, Its a little noisy so, my improvement is to zip tie it the motor to the plastic container which absorbs much
of the noise of the motor and at the same time delivers the same or if not better performance needed
to agitate the seasoning container. As you can see in the modified image below.


The switch is coupled directly to the 1.5 dc motor. With the motor and switch mounted and wired I carefully
reassembled the top of the container. After cutting a rectangle in the bottom of the metal pepper container.
I used a demel cutting tool to make the cut.  Before making the modified cut in the pepper container 
I wanted to find a battery compartment to tailor the cut to perfection. Below is a used battery compartment from a used am radio.


With the motor and switch coupled there are only two wires left , the remaining wire from the switch and the remaining wire from the motor. both of these wires will be the connected to the battery power supply holder.


Once the battery compartment connections are made you can begin mounting the battery compartment to 
the pepper container. Before you do you may want to test your battery connections. Even though,
the motor will work no matter which way you connect the wires, it will have 
better agitating effects if the motor is rotating in a counter clockwise fashion . So check before you make
 your connections permanent.


Be sure to recess your battery compartment when mounting so that the container will stand naturally by itself.


Lastly, screw on the container cap and drill holes  positioned as if you are using the gadget.

Tuesday, July 19, 2011

Zipit, Twist and Lock Soda Cap Zip Ties

                                             
          Time Is money so, use your Ties to

                  Save Money!!

 Are you still spending those timely efforts and money to zip tie your most important computer cables just to take that risk of cutting into them just for a simple computer system upgrade. Well, that's now a thought of the past with this simple concept you can use this zip tie over and over again. Just 3 simple items and your're in business. I have been using this for some time and it comes in pretty handy just don't go snooping around in your neighbors  trash for soda bottles lol.

You're going to need these 3 Items:

1. 16oz. soda of your choosing
2. Soldering Iron
3. medium or large zip tie

Using a small hobby saw cut off the top of the soda cap where the colored band separates the cap from the neck of the bottle. Be careful when using sharp and heated tools. In my vid I was cutting free handed however
I suggest using a vice for better control of the saw.


After cutting the cap from the bottle your going to need to remove the colored band from the cap. The
colored band has no purpose for this project and its actually in our working area. I used a small pair of
bandage scissors to remove it.


After removing the colored band, you'll see some uniform gaps that clearly can be seen if you hold the cap in a upright position. These uniform gaps will be imaginary lines when your ready  to heat holes into the cap.
as shown below.


Using your imaginary lines melt 2 slots into the plastic cap one on top of the other. However using the same imaginary line your going to melt a hole on the opposite above the collar of the cap as shown below.


 Insert a zip tip through the inside of the cap and around the outside underneath the cap and into the top
hole of the cap, and continuing through the opposite side through to the top hole as shown above.


                                                  Your done !


Let's try it out


I'm not using them !  I hope this tool will help you


Here are just some items that I use to Zip Tie when organize your accessory affairs. You guys have been
Great thanx!